Waterproofing
BETONGUAINA.S is an integrated water-based waterproofing system composed of:
- component A: aqueous dispersion of polymers and additives;
- component B: reactive fillers;
After film formation, BETONGUAINA.S forms a film with both excellent waterproofing and elasticity characteristics at low temperatures, up to -30°C reinforced with NYCON 200, up to -20°C with NYCON 100.
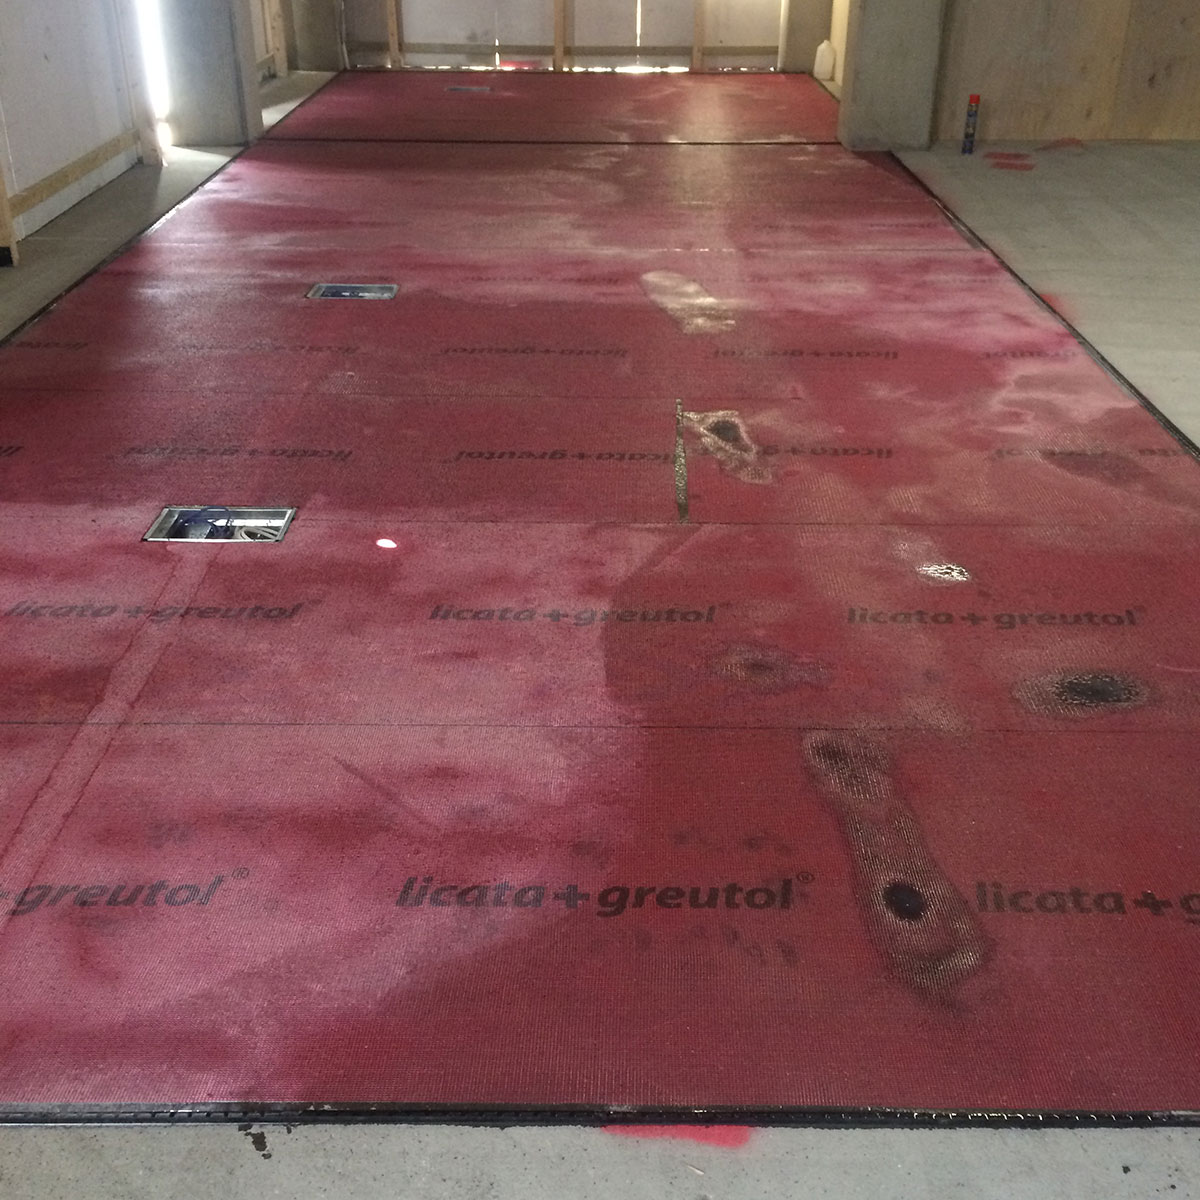
BETONGUAINA.S is used for manufacturing “in-situ”waterproofing membranes.
- Can also be applied at low temperatures
- Is resistant to ultra violet (UV) light
- Is very fluid, without water addition
- Easily impregnates any reinforcing meshes
- Reinforced with NYCON 200 allows the obtainment of a waterproofing coating capable of withstanding substrate cracking up to 2.5 mm at -20°C and up to 1.5 mm at –30°C
- Forms a very compact film
- Exhibits excellent adhesion to concrete and ceramics
- Is easy to prepare and easy to apply
- Guaranteed minimum performance at temperatures ranging between –30°C and +80°C if reinforced with NYCON 200
- Guaranteed minimum performance at temperatures ranging between –20°C and +60°C if reinforced with NYCON 100
Usage field
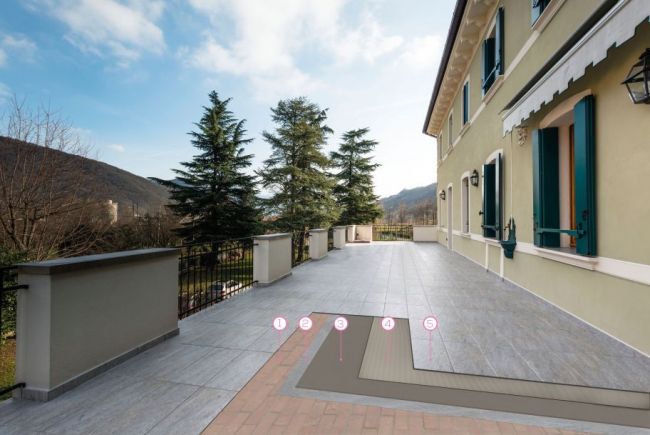
- BETONGUAINA.S reinforced with either NYCON 100 or NYCON 200, is used to waterproof flat roofs, terraces, balconies, solar pavings and flashings.
- BETONGUAINA.S is used to waterproof -according to the design- foundation walls that remain perpetually wet, balcony risers, perimeter walls, chimneys, etc.
- BETONGUAINA.S is highly suited for waterproofing walkable surfaces.
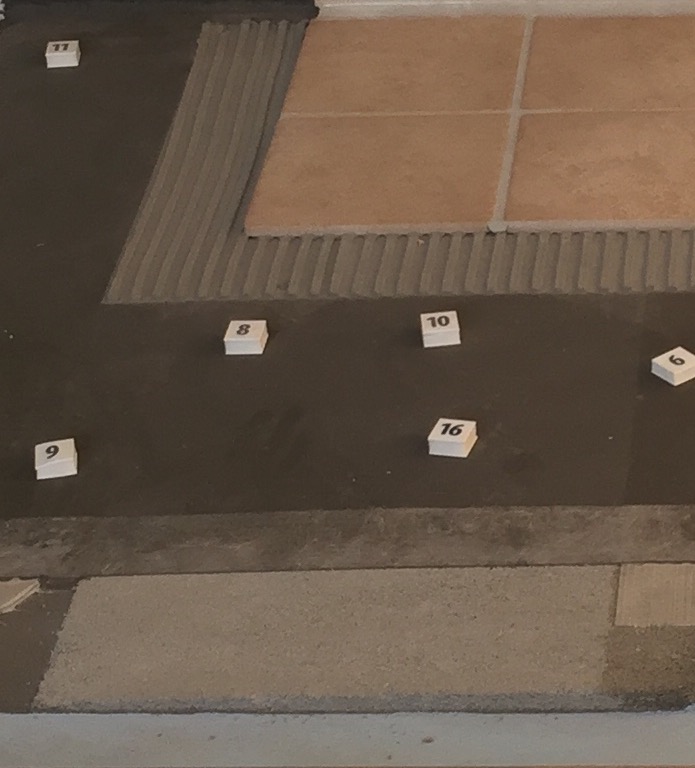
- Tiles can be directly bonded onto BETONGUAINA.S with tile adhesive BETON-H 1 (Class C2TES2).
Coverage varies depending on reinforcement structure type:
- with NYCON 100: 2.1 kg/m2
- with NYCON 200: 2.4 kg/m2
- Old ceramic / gres tiled surface;
- NYCON 100 / NYCON 200;
- BETONGUAINA.S;
- BETON-H 1;
- New ceramic / gres tiled surface.
Substrates preparation
Substrates made of either sand/cement or pre-packed cementitious screed
Both sand/cement substrates and pre-packed cement screeds (type SC 1 and SC 1-F) can be either floating screeds (non adhering to the substrate) or structural screeds (directly adhering to the substrate). The GROVE MASSETTO screed should only be used as a structural screed, adhering to the substrate.
In the case of a floating screed, the substrate minimum thickness, close to the drain pipe, should be of at least 35 mm with a SC1-F screed.
In the case of a structural screed, the mixture proper adhesion to the substrate should be ensured by pretreating the area -a few minutes before pouring the mixture- with a slurry made mixing together GROVE PRIMER (1 part by weight) and GROVE MASSETTO (3 parts by weight).
The best possible way to finish off these kinds of substrates can be obtained by using a power trowel fitted with a floating disc over the product while still wet: no cavity should be visible on the surface (“closed pore“ trowelling) and, after curing, the screed must not show any tendancy “to give off dust” (a sign of the poor cohesion of the material). If this phenomenon occurs, the surface must be consolidated according to the following scheme:
| substrate temperature | product to be used |
| From 0°C To +50°C | NORPHEN FONDO IGRO
Is a product based on hygro-hardening resins diluted with a specific solvent, to be applied by roller for a coverage of approx. 150 g/m2 (variable depending on substrate’s porosity) |
| From +10°C To +50°C | NORPHEN SW SOLID
Is a product based on water soluble epoxy resins, to be applied with a roller and diluted with 3-4 parts by weight of water, for a concentrated product coverage of roughly 50 g/m2 (variable depending on surface porosity) |
After the reinforcing agent has dried proceed with the installation of BETONGUAINA.S.
Note: in order to correctly prepare these types of substrates, to prevent the screed construction/cold joints from becoming a joint, an electro-welded reinforcement mesh (wire diameter of either 5 or 6 mm) must be embedded during the laying phase half in the first bay while the product is still fresh (along the free edge of the incomlete pour) and half in its subsequent neighbour.
Existing layer of clinker tiles, stoneware, etc.
Before laying BETONGUAINA.S on existing tiled floors, verify that tiles are firmly adhering to the substrate
In the case of good adhesion, perform an acid wash on the surface with diluted NORDECAL FORTE (1 part by volume of product with 1 part water), mechanically operating using a mono-brush equipped with a fibre-brush; the resultant liquid shall be sucked, the area rinsed thoroughly and standing water eliminated from the surface using a wet vacuum cleaner. Any concretions shall be removed using a diamond wheel.
Proceed with the installation of BETONGUAINA.S and do not necessarily wait until the substrate is completely dry.
In case of poor adhesion of part of the coating, proceed as follows:
- remove all loose and incoherent parts, cleanup and vacuum out the dust;
- to all areas that are to be repaired, apply with a brush a liquid grout obtained by mixing together 1 part by weigh of GROVE PRIMER and 3 parts by weight of GROVE MASSETTO used as an adhesive primer;
- wet on wet restore the remaining gaps with GROVE MASSETTO;
- to make the surface planar, even out the joints between the tiles by skim coating with GROVE MASSETTO anchored to GROVE PRIMER;
- the day after (at room temperature higher than +15°C and with a thickness of less than 5 mm) or later (in wintertime the product used to skim coat hardens more slowly, therefore requiring 6-7 days), proceed with the installation of BETONGUAINA.S.
Flat roof made of cast concrete for pedestrians traffic
Proceed as follows:
- make sure a proper closed-pore finish of the surface is achieved by power trowelling. If not, the entire surface should be skim coated with GROVE MASSETTO admixed with approx. 1/3 by weight of GROVE PRIMER to either eliminate any existing cavities and porosities, or create a planar area;
- after 2 days (at room temperature higher than +15°C and thickness of less than 3 mm) or later (in wintertime, the product used to skim coat hardens more slowly, requiring even 6-7 days), proceed with the installation of BETONGUAINA.S.
Existing resin floor with quartz mortar finish
Proceed as follows:
- grind the existing floor using a diamond cup grinding wheel (type Bosch GBR 14 CA) to remove any kind of dirt or grease normally widely present on these types of coatings;
- remove the dust created during the grinding process with the appropriate suction devices.
If the adhesion to the substrate of the resin floor is:
- sufficient (i.e.: no clear disbond between the resin layer and the substrate during the grinding process), it is possible to immediately proceed with the installation of BETONGUAINA.S;
- insufficient, proceed as follows:
a) remove all loose particles;
b) repair the gaps that have formed with GROVE MASSETTO anchored to the substrate with GROVE PRIMER;
c) after 2 days (at room temperature higher than +15°C and thickness of less than 5 mm) or later (in winter the product used to skim coat hardens more slowly, requiring even 6-7 days), proceed with the installation of BETONGUAINA.S.
Existing bituminous membrane
Proceed as follows:
- the substrate shall be thoroughly cleaned (using, if possible, a high pressure cleaner), especially to remove accumulations of soil resulting from standing water areas;
- ensure that the bituminous membrane is perfectly adhering to the substrate. If not, cut the membrane here and there along the disbonding area, lift the loose flaps and restore the adhesion to the substrate with a gas torch.
In the case of normal membranes (unprotected):
- the surface should be primed with FONDO IGRO SL and within 15 minutes from priming a slight broadcasting should be carried out with quartz sand (grain size: 0.1–0.6 mm);
- allow at least 3 hours (at +25°C and 60% RH) to let the product cross-link due to the action of the atmospheric humidity until it hardens and becomes treadable (note: at temperatures below +25°C and humidity of less than 60% RH the cross-linking speed decreases; in all cases make sure that the product has hardened before proceeding with further step);
- proceed with the installation of BETONGUAINA.S.
In the case of membranes self-protected with slate colored chippings:
- chippings should be consolidated with BLACK SOLID.
In the case of bituminous membranes with reflective coating:
- The surface must be gas torch heated for BETONGUAINA.S improved adhesion to the substrate.
Other types of protective coatings of bituminous membrane (such as metal foils, water or solvent based coatings, resin coatings) must be carefully checked to verify their adherence to the underlying membrane: this avoids any risk of disbonding between BETONGUAINA.S and the bituminous membrane.
Specific preparation
Preparing substrates with existing cracks
All cracks should be sealed with BETONSEAL MS 2.0 prior to the installation of BETONGUAINA.S, according to instructions provided in the specific Technical Data Sheet, if BETONGUAINA.S is to be installed without any type of finish.
If instead, either tile installation or the laying of STONE BRIGHT are to be carried out, the following treatments should be performed:
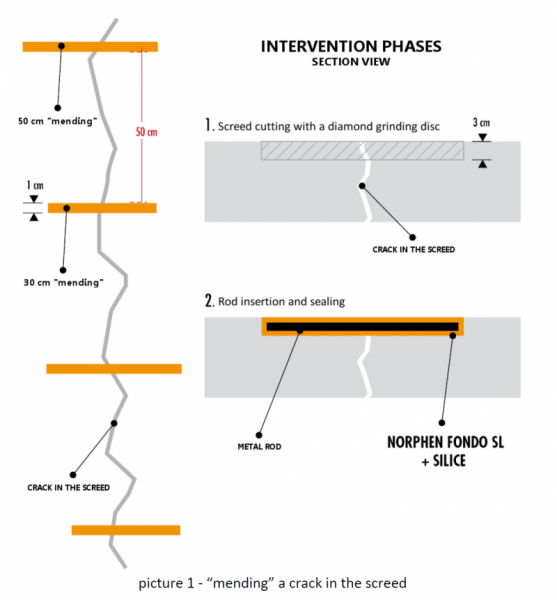
Stabilized cracks
A crack is considered stabilized if it was formed during the casting of the screed and does not cause continuous opening and closing movements.
The treatment should be performed by widening the crack with a diamond disc, carefully sucking up the dust and by casting NORPHEN FONDO SL thickened with 3-4% by weight of SILICA inside the crack until saturation.
Moving Cracks
By “moving crack” we mean a crack that tends to constantly open and close at a notable amplitude. The treatment is performed by entering the lengths of steel rods (8-10 mm in diameter) inside slots created with a diamond grinder at right angles to the crack and spaced about 50 cm from each other. The slots depth must be equal to about 2-3 cm and their width should match the diameter of the rod used.
After sucking up the dust from the slot, pour inside of it NORPHEN FONDO SL thickened with 3% by weight of SILICA, then insert the rod and cover it with NORPHEN FONDO SL thickened with 5-6% by weight of SILICA.
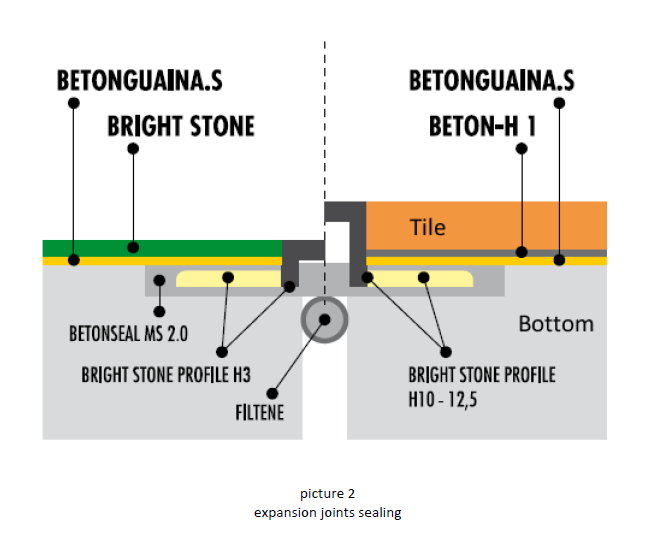
Preparing substrates with existing construction and/or expansion joints
In the case of sand and cement screeds, construction and/or expansion joints must be raised to the surface of the final coating whether it is a tile coating or BRIGHT STONE finishes: sections joints in industrial concrete scheduled to receive the waterproofing membrane can be stichted only after they have cured for more than 3 months.
To perform the treatment, the substrate must be lowered by 3 mm collaterally to the joint using a grinding machine fitted with a diamond disk (type BOSCH GBR 14 CA): the width of the lowered area should be equal to the diameter of the diamond disk. After sucking up the dust, apply a coat of NORPHEN FONDO IGRO and allow 10-15 minutes for solvent evaporation then insert a foam filler (type FILTENE) of suitable diameter into the entire lowered area upt to approx. 2 mm thickness with BETONSEAL MS 2.0.
Wet on wet, after having treated the two sides of the profile with BETONSEAL PRIMER, lay down a strip of B. S. PROFILE H-series, making sure to precisely center the profile on the joint and adjust the height of the positioning of such profile so that the side wings are at the same height of the top of the screed.
Coat the top face of the (uncoloured) side wings with a thin layer of BETONSEAL MS 2.0. Proceed with the installation of BETONGUAINA.S over the sealant while it is still fresh. B. S. PROFILE should be:
- 3 mm high if the chosen coating is BRIGHT STONE (B.S.PROFILE H3);
- 10 and 12.5 mm high if the coating is made from tiles with variable heights (B.S. PROFILE H10 or H12,5).
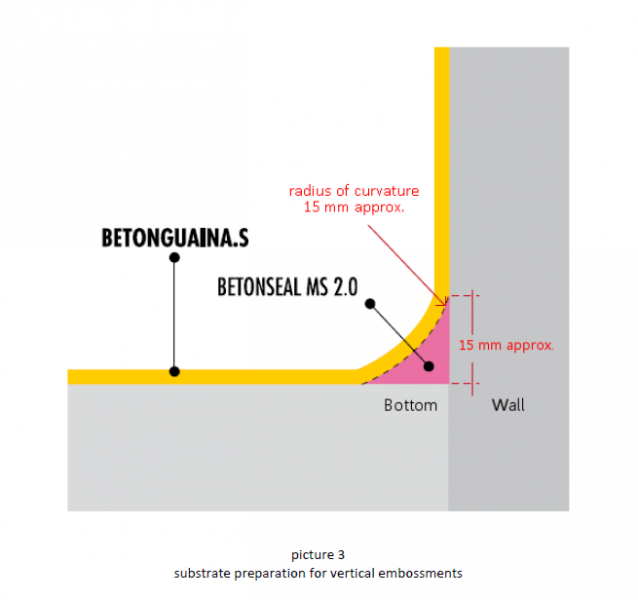
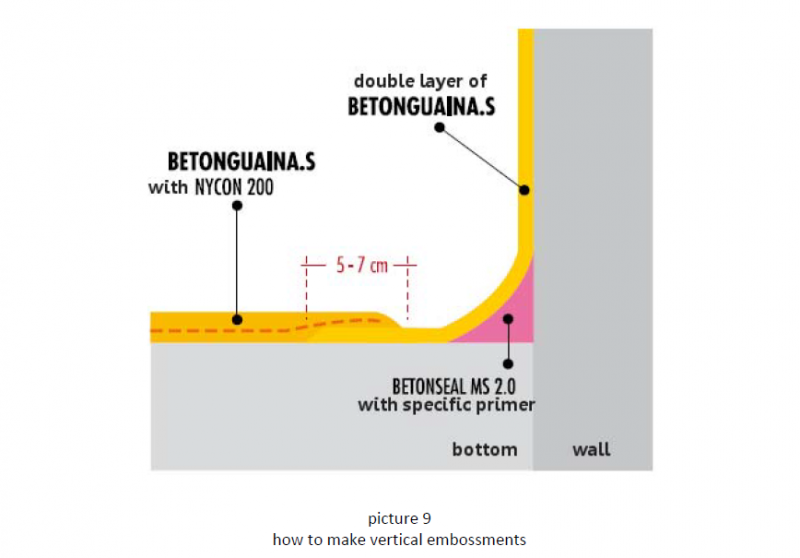
Preparing the substrate at vertical turn-ups
Turn-ups at floor wall junctions of terraces and balconies should be applied to the plaster (even if painted) after treatment with NORPHEN FONDO IGRO.
After 10-15 minutes, a cove with a radius of curvature of about 15 mm shall be created at the internal angle between the vertical and horizontal plane applying BETONSEAL MS 2.0 with a round toe trowel.
Wet on wet proceed with the installation of BETONGUAINA.S.
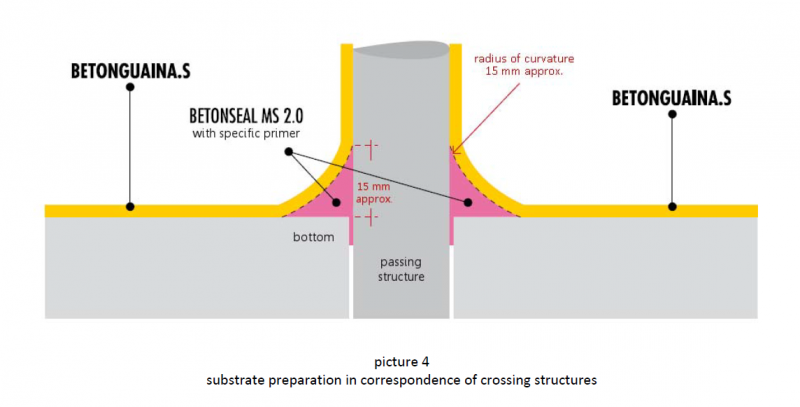
Preparing the substrate at passing structures
- After preparing the substrate and prior to the installation of BETONGUAINA.S, proceed to treat the surfaces as follows:
- sand on the surface top of either plastic or metallic passing structures (except rusted metal sheet) and then apply a coat of BETONSEAL PRIMER;
- rub on the surface of rusted metal sheet and apply REDOX, wait one day, brush with a steel brush and proceed with the application of BETONSEAL PRIMER;
- prime both concrete horizontal surface and sand-cement screed with NORPHEN FONDO IGRO;
- clean all tiled surfaces with NORDECAL FORTE and remove all concretions with a diamond grinder wheel;
- create a cove with a radius of curvature of about 15 mm at the angle between the passing structure and the laying surface applying BETONSEAL MS 2.0.
- wet on wet proceed with the installation of BETONGUAINA.S.
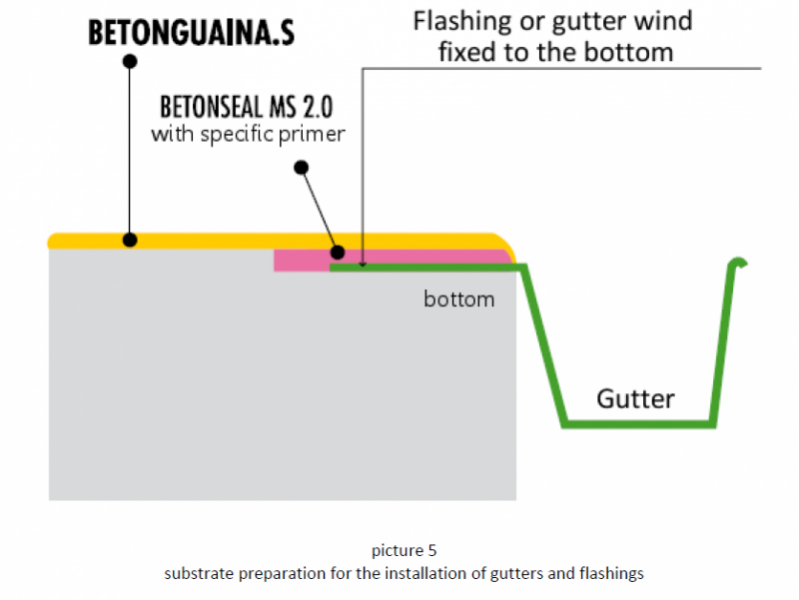
Preparing substrates to allow the installation of gutters and flashings
The purpose of the cycle shown below is to ensure both proper water flow prior to the installation of BETONGUAINA.S and to nullify the effects of the expansion of the metal wing of gutters and flashings:
- using a diamond cup grinding wheel (type BOSCH GBR 14 CA), the screed should be lowered by approx. 3 mm in the area where the supporting wing of the gutter is to be installed (a space of a width equal to the wing size + approx. 1 cm should be left for the sealant within the thickness of the lowered area, approximately 1 mm over the wing);
- both gutters and flashings must be mechanically fixed to the screed;
- suck up all the dust, apply a coat of NORPHEN FONDO IGRO only to the lowered area of the screed that has remained free and treat with BETONSEAL PRIMER the top surface of the wing;
- wait 10-15 minutes for the solvent to evaporate and then apply BETONSEAL MS 2.0 to the lowered area and over the gutter wing;
- wet on wet proceed with the installation of BETONGUAINA.S.
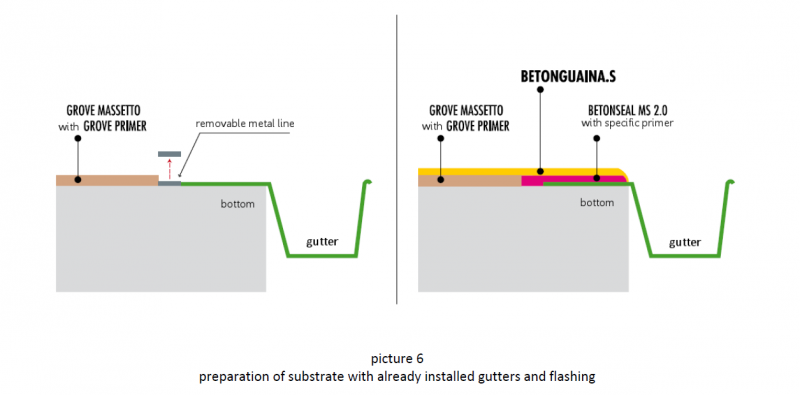
Preparing substrates with existing gutters and flashings
The purpose of the cycle shown below is to ensure proper water flow prior to the installation of BETONGUAINA.S:
- to rectify the slope of the floor by applying GROVE MASSETTO anchored to the substrate with GROVE PRIMER ensuring that 1 cm wide and approx.3 mm thick metal rule is positioned against the free edge of the gutter wing;
- to remove the metal rule and wait until GROVE MASSETTO is fully cured;
- to apply a coat of NORPHEN FONDO IGRO exclusively to the area of the floor included between GROVE MASSETTO and the edge of the gutter, treat with BETONSEAL PRIMER the top face of the wing of the artifact;
- to allow 10-15 minutes for solvent evaporation and then to apply BETONSEAL MS 2.0 to the lowered area and over the gutter wing;
- wet on wet to proceed with the installation of BETONGUAINA.S.
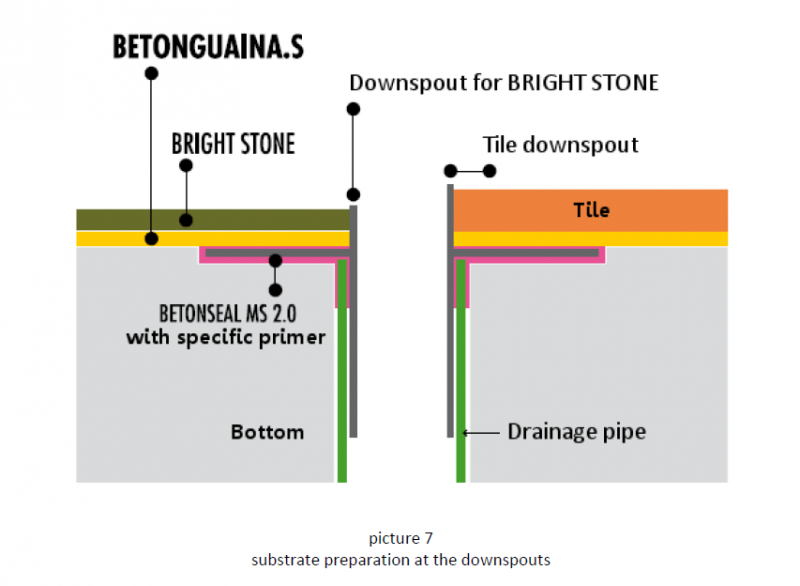
Preparing the substrate at rain water pipes
When executing waterproofing with BETONGUAINA.S, it is preferable to use drains and rain water pipes made of PVC with a perforated flange: BETONGUAINA.S can be laid on this kind of material provided that the surface is treated and coated with BETONSEAL PRIMER and covered by BETONSEAL MS 2.0.
To prepare the substrate proceed as follows:
- create a lowered area with a thickness of 2.5-3 mm in the surface of the screed to be waterproofed, centred on the drain, suitable for holding the flange of the rain water pipe (see figure below);
- apply a coat of NORPHEN FONDO IGRO on the cementitious surface and treat both the flange lower face and the upper face with BETONSEAL PRIMER;
- wait 10-15 minutes and then apply a layer of BETONSEAL MS 2.0 of a thickness of not less than 2 mm onto the lowered area;
- place the rain water pipe, and press the flange down to bring out the sealant and distribute it evenly over the flange;
- wet on wet proceed with the laying of BETONGUAINA.S.
The same procedure can also be adopted to install cornered rain water pipes.
NORD RESINE offers a wide range of specific rain water pipes made of plastic and stainless steel suitable to be used with BETONGUAINA.S.
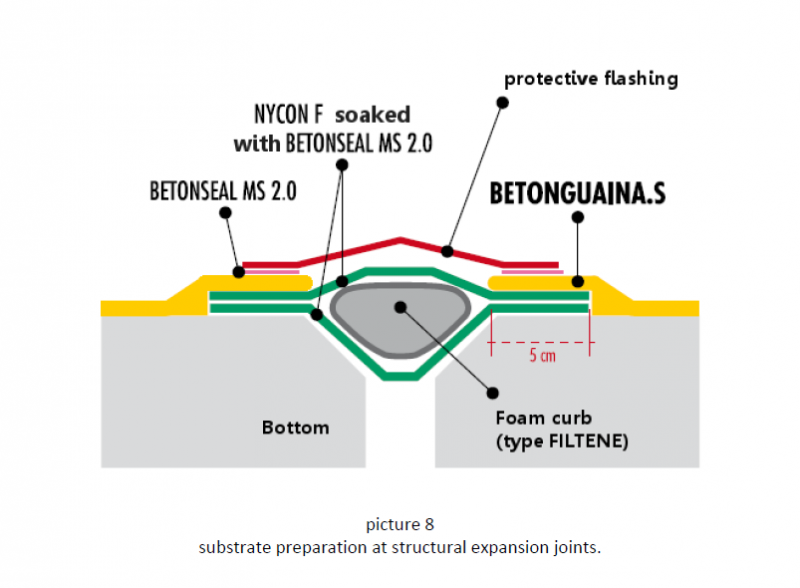
Preparing the substrate at structural expansion joints
To prepare the substrate at expansion joints, proceed as follows:
- bevel the joint sharp edges at a 45 degree angle using a grinder
- cut, off site, an approx. 15cm wide NYCON F reinforcing mesh strip;
- prime the substrate area scheduled to receive the coating with NORPHEN FONDO IGRO and wait for 10-15 minutes;
- fully impregnate both sides of the reinforcing mesh with BETONSEAL MS 2.0 using a steel trowel;
- lay the mesh across the joint and push it toward the inside to form a cavity capable of containing a foam expanded foam curb (type FILTENE) of a suitable diameter, i.e. 2-3 mm larger than the width of the joint;
- cover the joint cavity and the curb placing another strip of NYCON F (impregnated as above mentioned) over the previous one;
- wet on wet install BETONGUAINA.S onto the surface, but leave the joint uncovered.
- It’s always appropriate to seal the joint with a protective flashing fixed to the membrane with BETONSEAL MS 2.0 after having primed the bonding area with BETONSEAL PRIMER.
Product preparation
Preparing BETONGUAINA (A+B)
To prepare the liquid mixture of BETONGUAINA.S (A + B), proceed as follows:
- homogenize component A, mixing with a low speed professional mixer equipped with helix impeller of a suitable size according to the dimensions of the container (10 cm diameter for the 10 kg pack, 15 cm for the 20 kg pack);
- enter approx. half the weight of component A into a mixing container ;
- pour the entire contents of component B into the same container;
- mix thoroughly to obtain a homogeneous, lumps free mixture;
- add remaining compound A (liquid), mix and proceed with the application.
Product application
Vertical turn-ups
To waterproof vertical turn-ups, proceed as follows:
- if the edge between wall and floor shares regular faces, cut from the roll an approx. 20 cm wide strip of reinforcing mesh choosing NYCON F or, alternatively, VETROMAT 22 in the case of irregular surfaces;
- wet on wet apply -using either a flat brush or a roller- BETONGUAINA.S over the cove made of BETONSEAL MS 2.0 and over the turn-up to be realized; place the reinforcing mesh and fully impregnate;
- repeat the same procedure and apply another reinforcing mesh strip within approximately 1 hour (at 20°C);
- at particular points (such as sub-threshold, sharp and convex angles, etc.) where greater product adaptation is required, use only double layers of VETROMAT 22 strips;
- then proceed to the installation -on the flat surface- of BETONGUAINA.S with reinforcing mesh NYCON 100.
Passing Structures
To waterproof passing structures proceed as follows:
cut from the roll some 20 cm wide VETROMAT 22 reinforcing mesh strips;
apply BETONGUAINA.S (A+B) with a flat brush on the turn-up to be made and on the already made BETONSEAL MS 2.0 cove;
position the reinforcing mesh strip and wet on wet fully impregnate;
repeat the process with another VETROMAT 22 strip within approximately 1 hour (at 20°C);
then proceed with the installation, on the flat surface, of BETONGUAINA.S with NYCON 100 reinforcing mesh strips.
Flat or sloped surfaces (with a slope of less than 5%)
To waterproof these kind of surfaces, proceed as follows:
- cut from the roll some NYCON 100 reinfocing strips into a max length of 10 m;
- pour BETONGUAINA.S (A+B) on the laying surface spreading an amount of approx.1.5 x kg/m2 with a steel trowel, then, immediately after, place over the entire surface the reinforcing mesh NYCON 100;
- make NYCON 100 perfectly adhere to the laying surface with a trowel by vigorously spatulating on the reinforcing mesh: in this way BETONGUAINA.S (A+B) will start to impregnate the reinforcing mesh from the substrate up;
- pour another amount of BETONGUAINA.S (A+B) on the reinforcing mesh and impregnate to saturation.
The formation of bubbles in the membrane during the drying process can occur when:
a) the amount of product applied to the installation substrate was not enough to fully impregnate the reinforcing mesh from the bottom up;
b) the laying support is not perfectly smooth and exhibits some small depressions.
The technical specifications of this waterproofing membrane are guaranteed provided that consumption and thickness values are within the allowable range shown in the following table:
| minimum tolerated value | maximum tolerated value | |
| coverage (A+B) [kg/m2] | 2.2 | 2.8 |
| thickness [mm] | 1.2 | 1.5 |
Minimum curing time:
- 24 hours in summer, at temperatures above +20°C;
- 15 days in winter, at temperatures close to 0°C
Maximum curing time before laying any additional finishing
- no limit.
Overlaps
In order to secure proper execution of work, reinforcing mesh strips must be overlapped by at least 3÷5 cm.
Making the “day joint”: by “day joint” we here refer to a BETONGUAINA.S construnction/cold joint poured over some other existing product laid down at least 4 hours before. To ensure the adherence of the new layer to the existing one, it is sufficient to apply a thin coat (80-90 g/m2) of FONDO C60 onto the overlap area from 20 to 5 minutes before proceeding with the day joint.
In the case where either very large structures or heavily loaded structures (such as roof gardens or parking areas) are to be waterproofed, an additional application cycle of reinforced BETONGUAINA.S should be carried out 1 day after the installation of the first layer.
Finishes
BETONGUAINA.S waterproofing membranes can be finished in different ways depending on the intended use and design.
In case of exposed waterproofing membranes
To obtain a colored finish in case of low pedestrian traffic, a coat of BETONCOLOR (see the related Technical Data Sheet) shall be applied with a roller to a sufficiently dry BETONGUAINA.S layer (24÷36 hours after the last coat is applied).
In case of pedestrian and vehicular trafficable waterproofing membranes
Apply BRIGHT STONE/STONE EASY, a high scratching and abrasion resistant self-cleaning and non-slip quartz coating. BRIGH STONE is the ideal finish for BETONGUAINA.S waterproofing systems where a resistant tile surface is required with very thin thickness.
In case of direct tile bonding
Proceed with the installation of tiles on the BETONGUAINA.S layer using the specific adhesive BETON-H 1 with an average consumption of 2.5 ÷4.0kg/m2. Tiles must be laid with wide joints. Ensure to carefully leave a space of not less than 5 mm between skirting and underneath tiles. Seal all floor joints (if needed) and the gap between skirting and tile with BETONSEAL MS 2.0.
| bulk density (A+B), ISO 1657 | g/ml | 1.45 ± 0.05 |
| viscosity (A), prEN 1781 | Pa·s | 53 (at 3 rpm) |
| viscosity (A), prEN 1781 | Pa·s | 1,5 (at 128 rpm) |
| PH (A), UNI 8311 | — | 7.2 |
| pot-life at 23°C, UNI 9598 (A+B liquid mixture viscosity doubling) | hours | 8 ± 2 |
| open time at 23°C | min | 10 |
| minimum film formation temperature | °C | +0.5 |
| surface drying time at, (*) | hours | 6 ± 2 |
| curing time | hours | 24 ± 6 |
| disbondment, UNI EN 28510 at 180°C on concrete | N | > 40 |
| disbonding, UNI EN 28510 at 180°C on ceramic | N | > 95 |
| ratio A : B | —- | 2 : 1 |
Note: test methods according to the standard shown in the table.
(*): Internal test method
Features of BETONGUAINA.S system (according to ETAG 005 parts 1 and 8)
| Reinforced with | NYCON 200 | NYCON 100 | |
| water vapour permeability, DIN 52615, EN 1931 | m | ≈6630 | ≈13060 |
| ultimate tensile stress (23°C), ISO 527 | MPa | 1,26 | |
| tensile elongation (23°C), ISO 527 (23°C) ISO 527-3 | % | 100,1 | |
| euroclass reaction to fire, UNI EN 13501-1 | – | E | |
| water tightness; EOTA TR003
(hydrostatic pressure: 1000 mm, time 24 hours) |
– | passed | Passed |
| wind load resistance, EOTA TR 004 | kPa | >50 | >50 |
| resistance to dynamic punching, EOTA TR 006 | – | I3 | I2 |
| resistance to static punching, EOTA TR 007 | – | L3 | L2 |
| resistance to fatigue movement, EOTA TR 008 | – | Passed | passed |
| resistance to the effects of low temperature, | – | Passed | — |
| dynamic punching at –30°C, EOTA TR 006 | – | I3 (-30°C) | I2 (-20°C) |
| resistance to the effects of high temperature:
punzonamento statico, EOTA TR 007 |
– | L3 (80°C) | L2 (60°C) |
| Resistance to heat ageing, EOTA TR 011 (testing after conditioning at 70°C for 200 days) | |||
| dynamic punching at –30°C, EOTA TR 006 | – | I3 (-30°C) | I2 (-20°C) |
| fatigue mouvement (50 Cycles), EOTA TR 008 | – | Passed | Passed |
| ultimate tensile strength, EN ISO 527-3 | MPa | 0,98 | |
| tensile elongation at break, EN ISO 527-3 | % | 64,9 | |
| Resistance to UV-radiation in the presence of moisture, EOTA TR 010
(testing after UV radiation conditioning for 2470 hours): |
|||
| dynamic punching at –10°C, EOTA TR 006 | – | I3 | I2 |
| ultimate tensile strength, EN ISO 527-3 | MPa | 1,48 | |
| tensile elongation at break, EN ISO 527-3 | % | 129,0 | |
| Resistance to water ageing, EOTA TR 012 (testing after water contact at 60°C for 30 days) | |||
| static punching at 80°C, EOTA TR 007 | – | L3 (80°C) | L2 (60°C) |
| delamination stress (concrete), EOTA TR 004 | kPa | 1317 | |
| delamination stress (bitumen based waterproofing), EOTA TR 004 | kPa | 328 | |